
This work is licensed under a Creative Commons Attribution-NonCommercial-NoDerivs 2.0 Generic License.
The benefits of blind contour drawing
Blind contour drawing is perfect for beginner, intermediate and advanced artists / Illustrators. It develops your hand-eye coordination, allowing you to practice drawing what you are actually seeing (rather than what you think you are seeing, or what you think you know) and also acts as a good warm up drawing exercise for your preparatory work when approaching a new subject matter, especially portrait and figure work, still life and illustration work. Blind contour drawing also helps you to experiment, play and loosen up your drawing while helping you discover your visual language / style.

An introduction to blind contour drawing
Blind contour drawing was a technique highlighted by Kimon Nicolaïdes in his book ‘The Natural Way to Draw: A Working Plan for Art Study’ (1941) (source: Oscarcerrato.files). ‘Contour’ simply means the outline, edge or line that defines or bounds a shape or object. Contour drawings are part of what are called gestural drawing techniques. Gesture, in drawing terms, means ‘the action of the hand and drawing tool as they follow the movement of the eye while it scans’ the object/s or figure/s searching for meaning (Stanyer and Rosenberg, 2003:10).
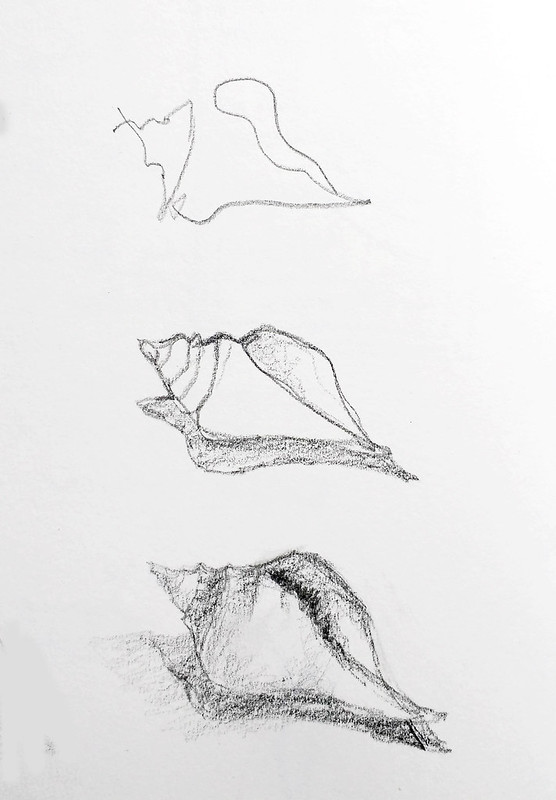
Contour drawings certainly form an important part of my preparatory work and I find they are good initial warm up exercise when you first approach a new subject matter. They allow you to loosen up, experiment and play while also allowing the essence, the intrinsic nature or indispensable quality, of the subject matter (which determines its character), to shine through in your drawing. My blind contour drawings of a boy, a shell and portrait are some examples from my sketchbook. The blind contour drawing of the shell (top drawing) took seconds to create, but still capture the essence. The shell drawings were part of some initial drawings in my sketchbook for some cabinet of curiosity artwork. The first contour drawing (blind) allowed me to successfully create further drawings below it, a seen continuous-line drawing and observational sketch, while keeping the important elements of the shell I had observed.
When you first start blind contour drawing you don’t have a lot of control over what you are drawing. This creates an element of surprise in your drawing and allows you to experiment and play with your drawing. As you develop your practice of blind contour drawing you will also start to see how you personally view the subject matter in your drawing, which forms part of your individual visual style or language that you can develop.
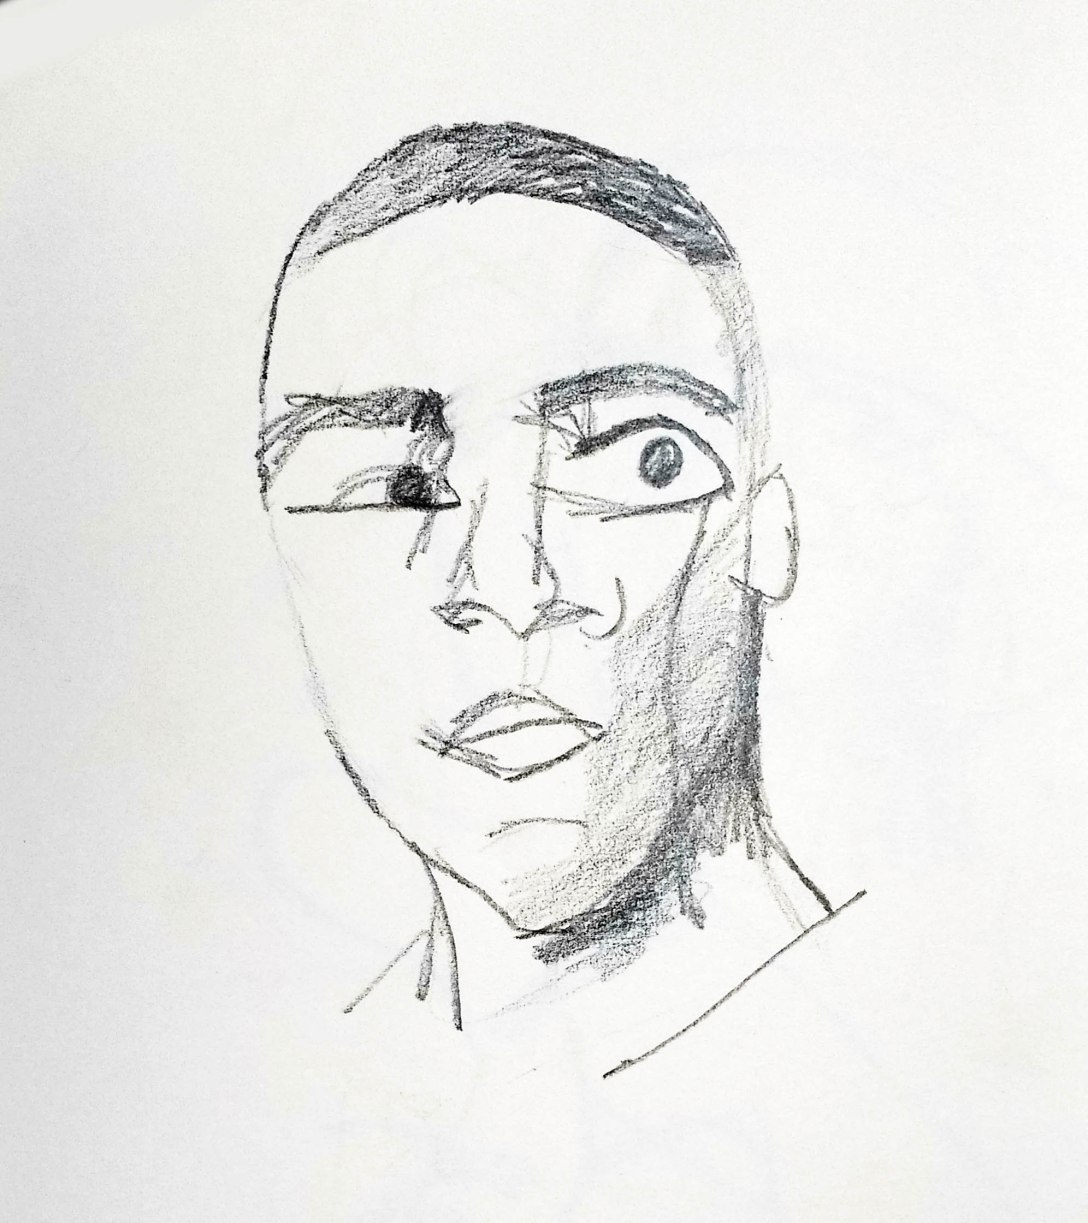
Although it is a simple exercise in theory, it is a hard one to do if you are a beginner. This is perhaps because you have to let go of the idea that everything you draw must be perfect. I’m not going to lie – this exercise is going to create some drawings you may consider messy and imperfect, don’t worry – this is how you develop your drawing skills and become a better artist. The results can be very unexpected and surprising, which is what appeals to me. One of my most surprising and, what I consider, successful blind contour drawings that brings together the essence of the subject matter and my own visual style / language was a portrait of a man’s head.

You can also decide how long you do this exercise. I recommend no more than 10 minutes for each drawing to start with, as you need plenty of concentration for this exercise. I personally do lots of quick blind contour drawings (that take a few minutes at a time) rather than a few long ones, as I find these produce fresher and more interesting drawings.
It is a simple exercise that takes a bit of practice to get used to. You can be very strict with yourself and not look at your drawing hand until you have finished the drawing (this only works well with very quick drawings) or have a couple of quick looks while your pencil or pen is off the paper before you continue.
Materials needed for a blind contour drawing exercise:
Paper: A4 sized (or larger) paper, newsprint or sketchbook
Pencil (B, 2B or 3B), biro or fibre / felt tip pen (try all and more if you can to see what you prefer)
Subject matter such as an object or objects to observe (you can draw from real life subject matter / object/s or found images from books, magazines, etc…)
Time required:
No more than 10 minutes for each drawing
Let’s get started…
How to do your own blind contour drawing
Blind Contour Drawing Exercise
1. Choose your subject matter – a good starting point is to focus on an object or a group of objects or your own non-drawing hand. It really can be anything. As you develop your practice you may choose to move onto figures, faces, scenes, etc…
2. Place yourself in a comfortable position where you can see what you are drawing (your subject matter) but not what your drawing hand is doing. I find doing this exercise in a sketchbook easier because I can use the cover and pages of the sketchbook to obscure my drawing hand so that I can’t see it. You can also use a piece of cardboard to hold over your drawing hand and drawing.
3. Looks at your object / objects, work out where you will start your drawing (focusing on one part is easy to start with) and place your pencil or pen onto the paper. Immediately cover, obscure or don’t look at your drawing hand or your paper / sketchbook and start to draw while you focus only on observing your object / objects. Let your eyes slowly follow the contours of the object / objects while your hand simultaneously draws what your eyes are observing. Kimon Nicolaides suggested that you ‘imagine that your pencil point is touching’ the subject matter: the object/s or figure/s ‘instead of the paper…, your eye might be tempted to move faster than your pencil [or pen], but do not let it get ahead’ (1941:10). Try to keep your pencil or pen in contact with your paper as much as possible.

3. As you progress with your drawing you may want to stop and lift your pen or pencil off the paper. At this point you may want to just continue to draw (starting a new contour line and seeing what happens) or look at what you have drawn briefly and them continue with your blind contour drawing. Resist the urge to erase or rub any lines out.

As a beginner this exercise helps you to develop your observational skills by improving your hand-eye coordination. It is also a good preparatory exercise for intermediate and advanced artists when approaching new subject matter, allowing the essence of the object/s or figure/s to show themselves in your drawings for you to then build upon. This is also a good exercise for artists and illustrators who are developing their visual language / style.
Feel free to ask questions and post your blind contour drawings in the comments section.

References
Stanyer, P., Rosenberg, T. (2003) A Foundation Course in Drawing. Arcturus Publishing Limited: London.

[…] I was really pleased with the praying mantis using the food processor illustration – with the magnified eye! Hope you like these illustrations. If you would like to learn more about blind contour drawing and have a go yourself click here. […]
LikeLike
[…] technique borrowed from art students, blind contour drawing involves sketching the outline of an object or person without looking at the page or raising the […]
LikeLike
[…] technique borrowed from art students, blind contour drawing involves sketching the outline of an object or person without looking at the page or raising the […]
LikeLike